Leaky chimneys can lead to costly repairs if not addressed promptly. One of the most common culprits? Faulty or damaged chimney flashing. Properly sealing your chimney flashing is a crucial step in keeping your home protected from water damage. Homeowners in Bergen County especially need to pay attention to this as the area experiences a range of weather conditions. Here’s a comprehensive guide on how to seal chimney flashing and prevent those dreaded leaks.
What Is Chimney Flashing?
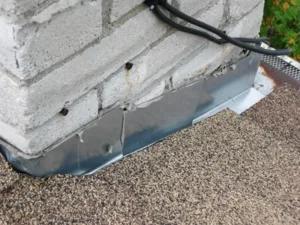
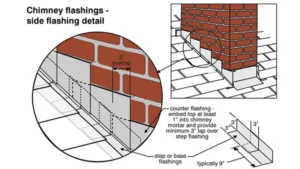
Chimney flashing is a sheet of material—usually aluminum or steel—installed at the joint between the chimney and the roof. Its purpose is to create a watertight seal and prevent water from seeping into your home. Over time, weather conditions, poor installation, or normal wear and tear can compromise this seal, leading to leaks.
Signs Your Chimney Flashing Needs Sealing
- Water stains on walls or ceilings near the chimney
- Rust or corrosion on the flashing
- Visible gaps or cracks in the flashing material
- Mold or mildew in the attic or near the chimney
If you notice any of these signs, it’s time to take action.
Tools and Materials You’ll Need
- Roof-safe ladder
- Waterproof roofing sealant
- Caulk gun
- Wire brush
- Flashing repair tape
- Safety gloves and goggles
Step-by-Step Guide to Seal Chimney Flashing
- Inspect the Flashing: Before sealing, carefully inspect the flashing for signs of damage. Look for gaps, rust, or missing sections.
- Clean the Area: Use a wire brush to remove dirt, debris, and old sealant from the flashing and surrounding areas. This will ensure a strong bond for the new sealant.
- Apply Roofing Sealant: Load a waterproof roofing sealant into your caulk gun and apply it generously along the edges of the flashing where it meets the chimney and roof. Ensure all gaps and cracks are fully sealed.
- Reinforce with Flashing Tape: For added protection, apply flashing repair tape over the sealed areas. Smooth out the tape to remove air bubbles and create a watertight barrier.
- Check Your Work: Inspect the area to ensure there are no missed spots. It’s better to over-seal than under-seal, especially in areas prone to heavy rain or snow.
- Monitor and Maintain: After sealing, periodically check your chimney flashing to ensure the seal remains intact. Regular maintenance can save you from costly repairs down the line.
Why Professional Help Matters
While sealing chimney flashing can be a DIY project, it’s not always straightforward. Climbing onto a roof involves risks, and improper sealing could lead to recurring leaks. Hiring a professional like All Point Roofing & Chimney ensures the job is done safely and correctly the first time.
Preventing Future Chimney Leaks
- Schedule regular chimney inspections.
- Replace worn or damaged flashing promptly.
- Clean gutters to prevent water buildup near the chimney.
- Apply a waterproof chimney cap to reduce water exposure.
Trust All Point Roofing & Chimney for Your Chimney Needs
At All Point Roofing & Chimney, we specialize in protecting your home from water damage with expert chimney flashing repair and sealing. Whether it’s routine maintenance or emergency repairs, our experienced team has you covered.
Contact us today to schedule an inspection or learn more about our roofing and chimney services.
Final Thoughts
Sealing chimney flashing is essential for maintaining a leak-free home. By taking the proper steps or enlisting the help of professionals, you can prevent water damage and ensure your chimney remains in top condition for years to come. For reliable, high-quality service, trust the experts at All Point Roofing & Chimney. Our services are trusted throughout Bergen County for their quality and reliability.